
Export timesheets for payroll or your records
Choose a ready-made spreadsheet of approved hours, adjust how it's laid out, check the preview and download it as Excel or CSV.
Transcript
If you pay staff through a payroll system that isn't connected to Shiftly, you can export your timesheets as a spreadsheet. Here's how to pick a layout, check it and download it.
Open Export timesheets
On the Timesheets page, select Export at the top right. Export timesheets opens, with your location, the dates and the pay weeks they cover under the title.
Choose a spreadsheet
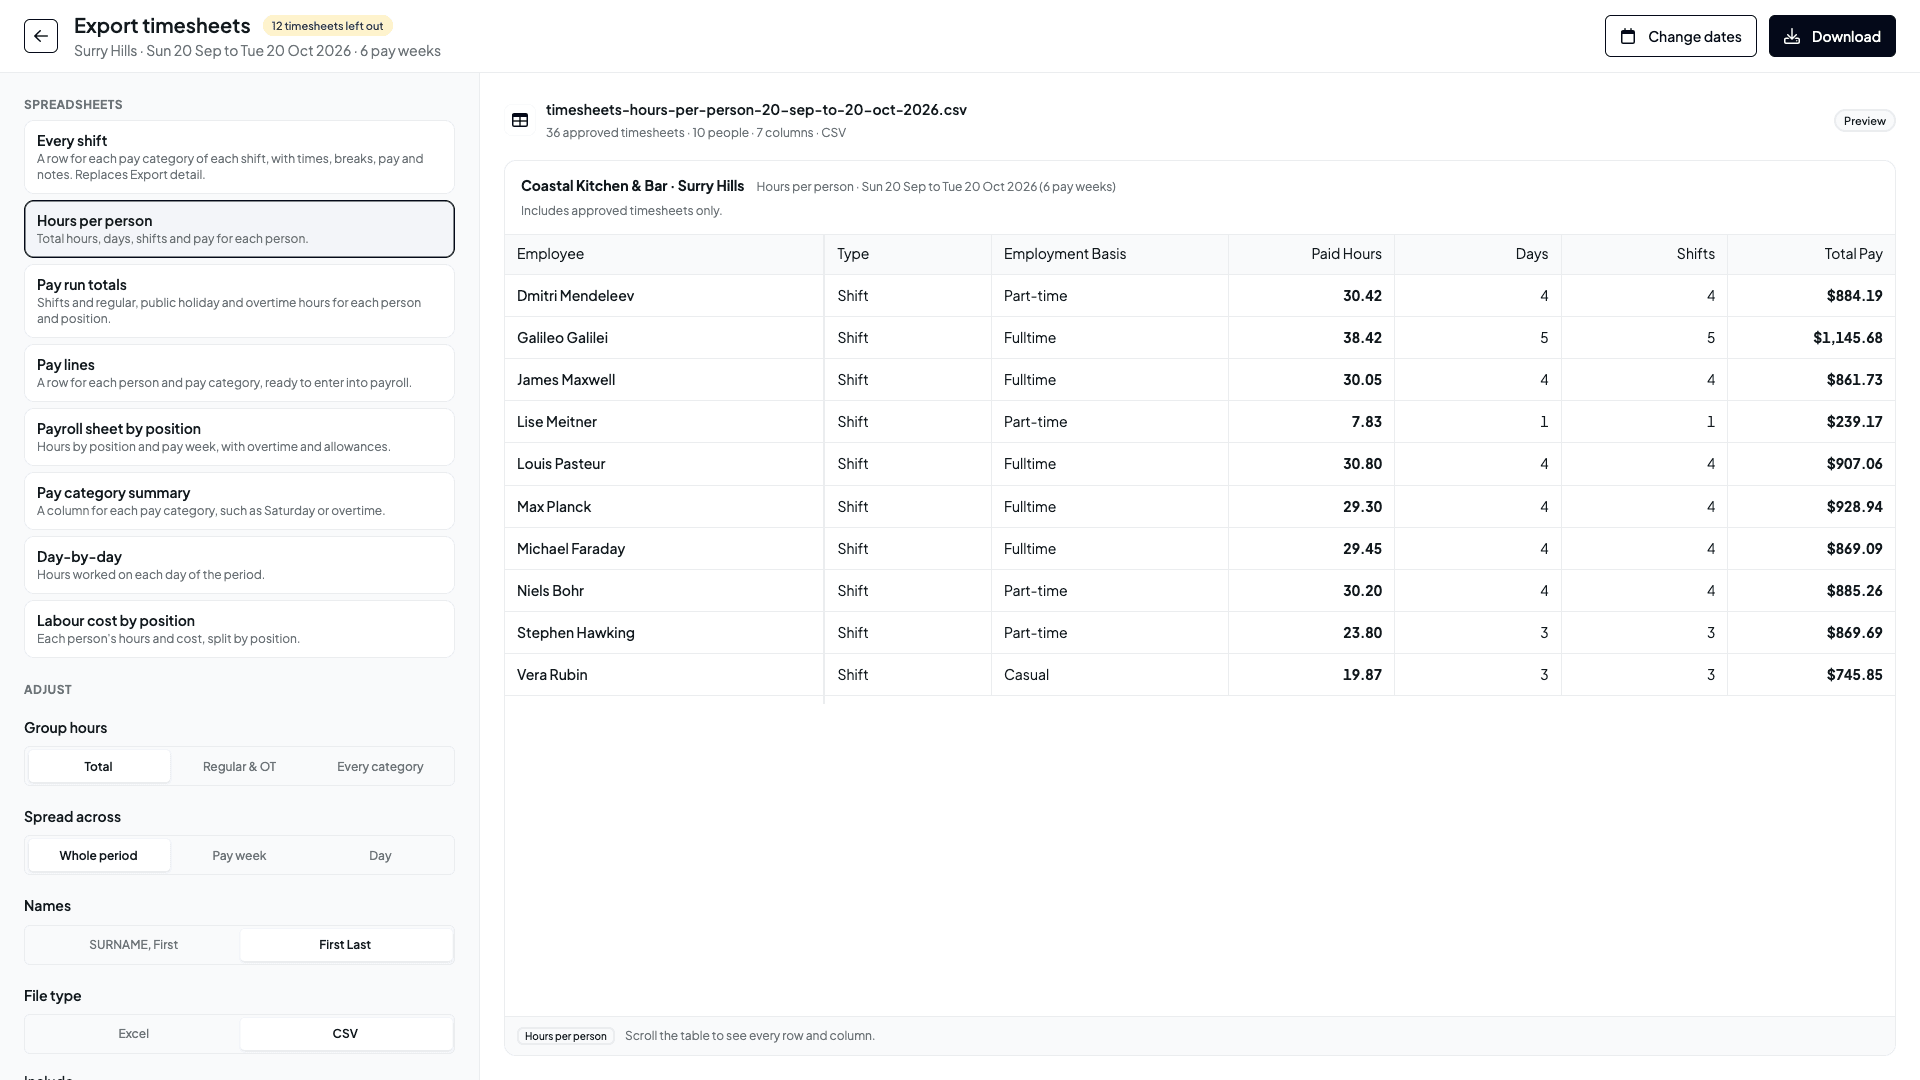
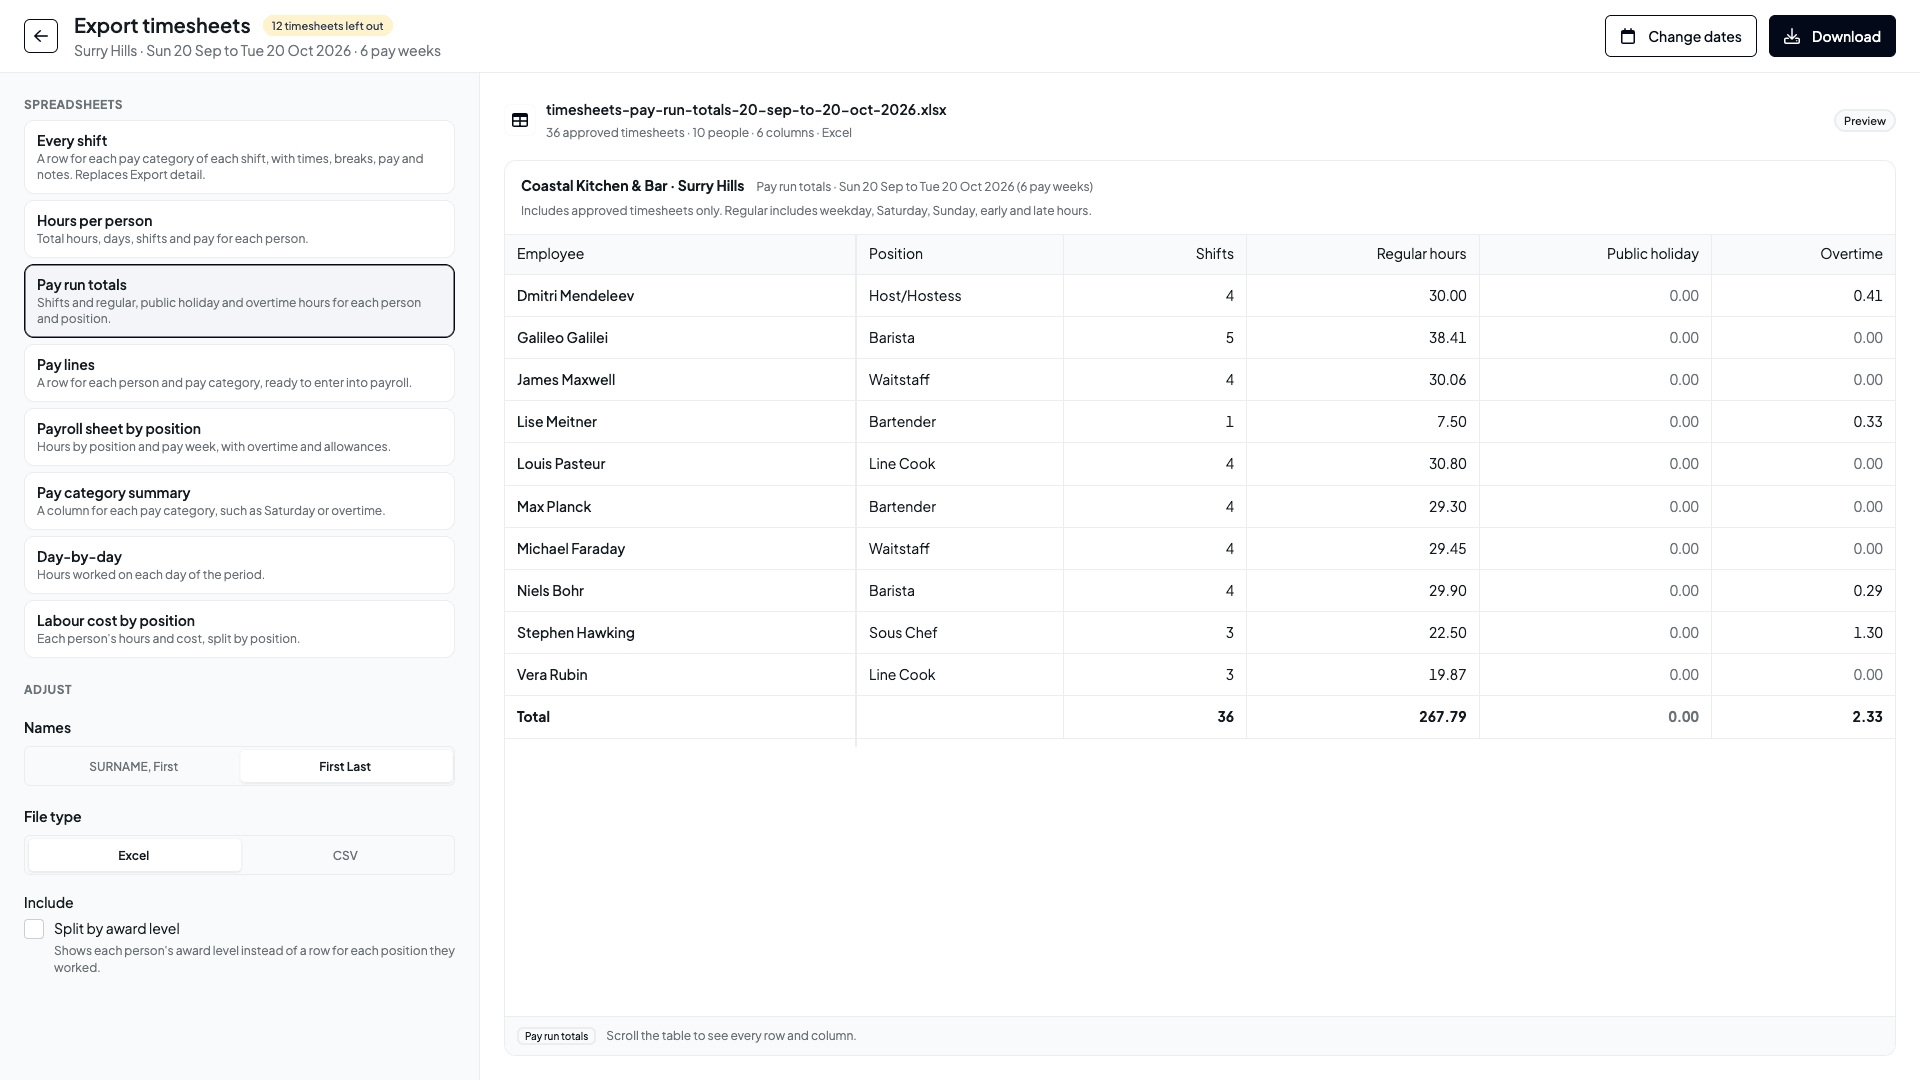
Under Spreadsheets, pick the layout you need. Hours per person is selected to start. Select Pay run totals, and the preview on the right updates with the file name and how many people it covers.
Adjust the layout
Select Hours per person again. Under Adjust, set Spread across to Pay week, choose Excel, and tick Split hours by position. Changing these makes a Custom layout.
Check what's left out
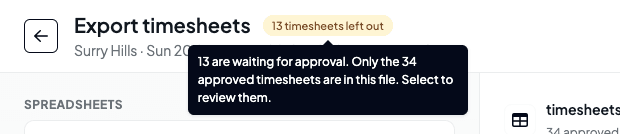
Most spreadsheets count approved timesheets only. When some aren't approved, a badge beside the title says how many are left out. Hover it to see why, or select it to go back and review them.
Change the dates
To export a different period, select Change dates. Pick a start and end date, or a preset such as Last week, then select Done.
Download the file
Select Download. Shiftly saves the file to your computer, and you'll see Timesheets downloaded.
Approve your timesheets before you export them, and check the figures against your payroll provider before you pay anyone.
When you pay staff through a payroll system that isn't connected to Shiftly, or you want a record of hours and pay, you can export your timesheets as a spreadsheet. Pick the layout you need, check it in the preview, and download it.
Who this is for
Owners, and managers whose access includes Timesheets. Pay amounts, pay categories and allowances need Pay & labour cost too, and so do the Pay run totals, Pay lines, Pay category summary and Labour cost by position spreadsheets, and adding leave needs Leave. Without them the export still gives you hours.
Before you start
- Open Time in the main navigation and choose Timesheets, at the location you want to export.
- Approve the timesheets for the period first. Most spreadsheets count approved timesheets only. See Review and approve timesheets.
- Set the date range in the toolbar to your pay period. The export starts on that range.
Export your timesheets
Open Export timesheets
Select Export at the top right of the Timesheets page. Export timesheets opens with the location, the dates and how many pay weeks they cover under the title, for example Surry Hills · Sun 20 Sep to Tue 20 Oct 2026 · 6 pay weeks.
If you ticked timesheets on the Timesheets page, or filtered the table, a box at the top of the settings keeps the export to those. Untick it to export the whole period.
Choose a spreadsheet
Under Spreadsheets, pick the layout you need:
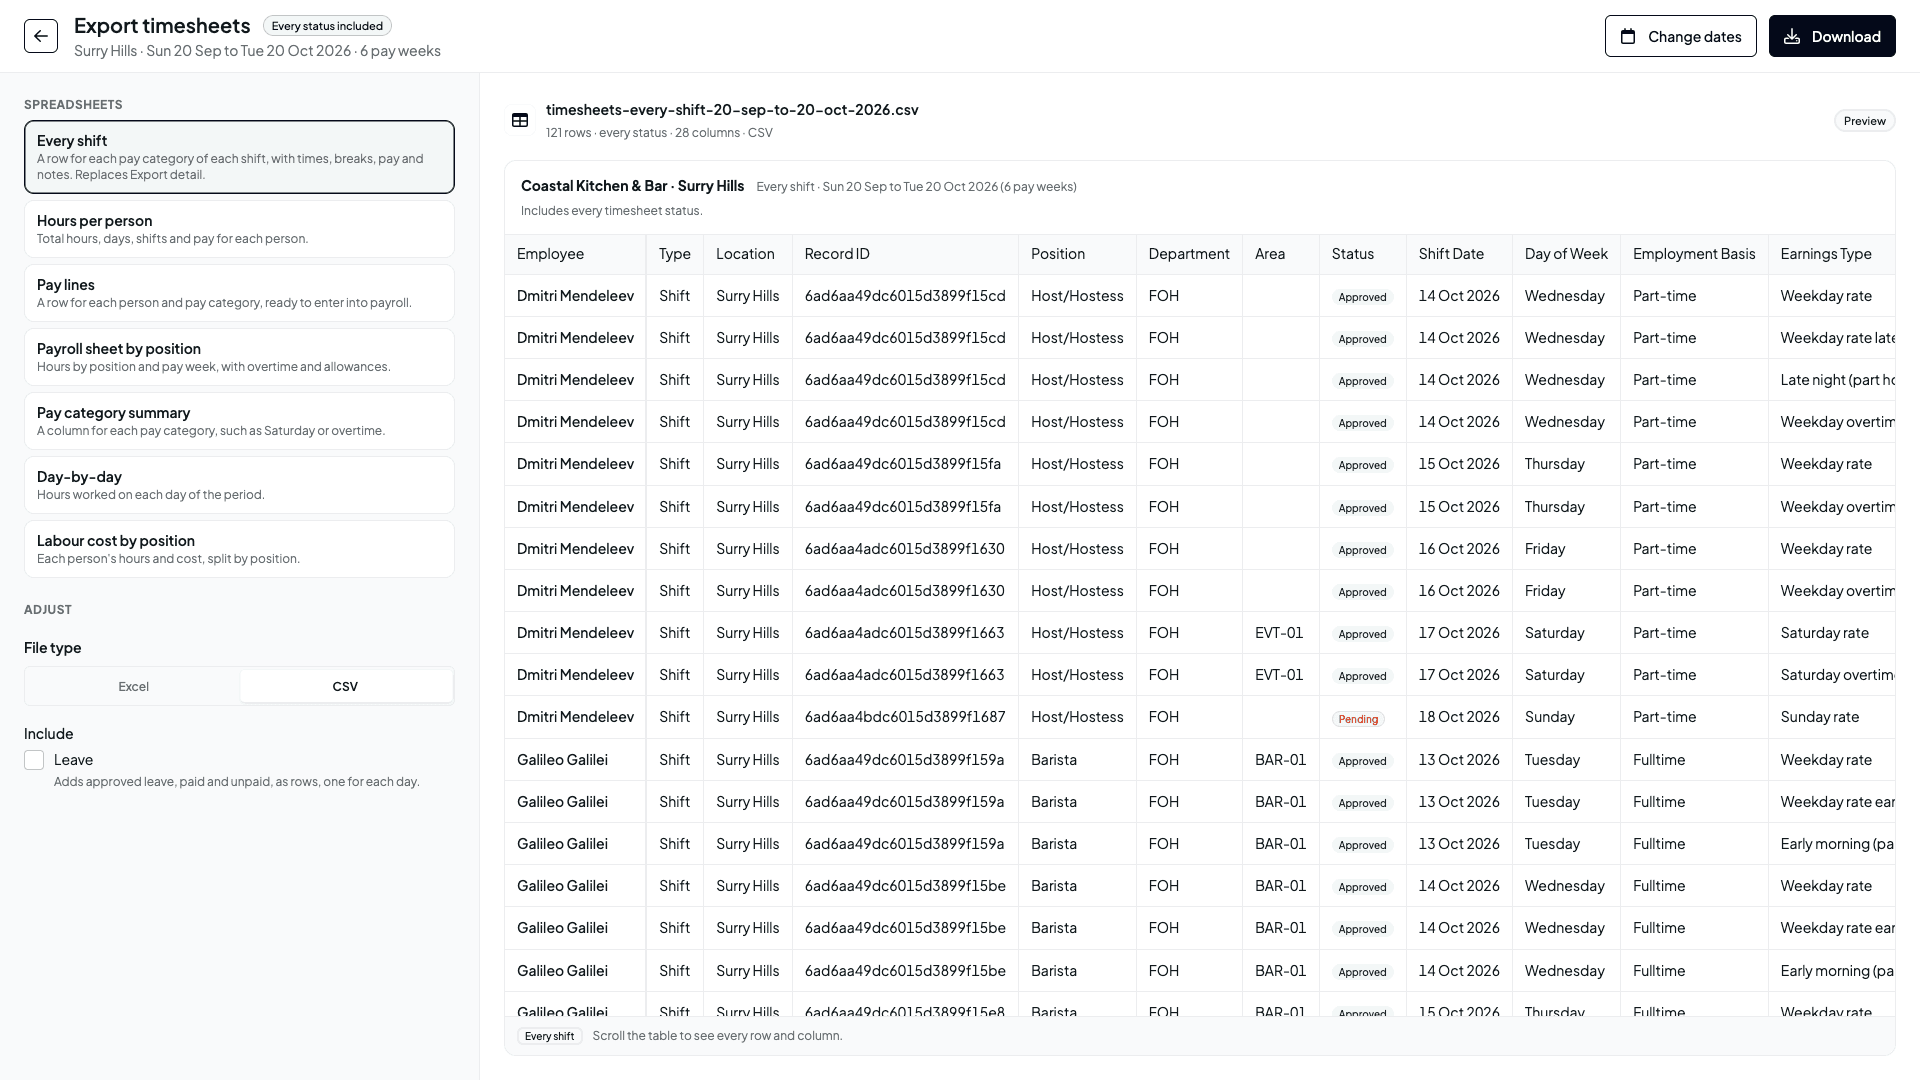
- Every shift: a row for each pay category of each shift, with times, breaks, pay and notes.
- Hours per person: total hours, days, shifts and pay for each person.
- Pay run totals: shifts, then regular, public holiday and overtime hours, for each person and position. Regular hours take in weekday, Saturday, Sunday, early and late hours.
- Pay lines: a row for each person and pay category, ready to enter into payroll.
- Payroll sheet by position: hours by position and pay week, with overtime and allowances.
- Pay category summary: a column for each pay category, such as Saturday or overtime.
- Day-by-day: hours worked on each day of the period.
- Labour cost by position: each person's hours and cost, split by position.
The preview on the right updates as you choose, with the file name and how many timesheets, people and columns it has.
If your business uses WageEasy, a Payroll import section below the spreadsheets also offers WageEasy import (.wtc), a timecard file to import into WageEasy. See Send timesheets to WageEasy.
Adjust the layout
Under Adjust, the options depend on the spreadsheet:
- Group hours: Total, Regular & OT (regular, public holiday and overtime) or Every category.
- Spread across: the Whole period, each Pay week, or each Day.
- Names: SURNAME, First or First Last.
- File type: Excel or CSV.
Under Include, tick what you want added, such as Split hours by position, Allowances ($), Cost ($) (gross pay, before super), Leave (paid leave, kept apart from hours worked), Staff with no hours or Employee number. Changing these makes a Custom layout; pick a spreadsheet again to start over.
Pay run totals has fewer options: Names, File type, and Split by award level, which shows each person's award level instead of a row for each position they worked.
Check what's left out
Most spreadsheets count approved timesheets only. When some in the period aren't approved, a badge beside the title counts them, for example 13 timesheets left out. Hover it to see why, and select it to go back to the Timesheets page and review them.
Every shift is the exception: it includes every status, and each row shows its timesheet's status, so you can check pending and rejected shifts too. Its Leave option adds approved leave, paid and unpaid, as a row for each day.
Change the dates if you need to
Select Change dates to pick a Start date and End date, or a preset such as Last week or This month, then select Done. A period can be a year at most.

Download
Select Download. Shiftly saves the file to your computer and confirms Timesheets downloaded. The arrow at the top left takes you back to Timesheets.
Exported figures are estimates from your pay rules and awards. Check them against your payroll provider before you pay anyone.
Related
Review and approve timesheets
Approve the hours before you export them.
Send approved timesheets to payroll
Send approved timesheets straight to a connected payroll provider instead.
Send timesheets to WageEasy
Download a WageEasy timecard file of approved timesheets each pay period.
Fix times, breaks and pay on a timesheet
Correct a timesheet before you export it.
Fix times, breaks and pay on a timesheet
Fix a clock-in or clock-out time, adjust breaks, change the position, or override pay rates on a timesheet before you approve it.
Send approved timesheets to payroll
Post approved timesheets to Xero from the Timesheets page, check what Shiftly flags before anything is sent, then finish the pay run in Xero.